
This article focuses on two major UFT One AI technologies:
1) Creating AI automated tests from screenshots
2) Creating AI automated tests from iPhone photos
I. Benefits of AI-Driven Screenshot Test Automation with Six Illustrated Case Examples
II. Benefits of AI-Driven iPhone Photo Test Automation with Six Illustrated Case Examples
III. Building an AI-Based Test Using Mockup Images: Step-by-Step Demonstration
IV. Cross-Browser Testing with UFT One AI: Chrome, Microsoft Edge, and Firefox
1. Early Test Creation from Mock-ups

Use case: Create tests from mock-up screenshots
• Automated tests can be built directly from mock-up screenshots, eliminating the need for a live application.
• This enables automation testers to develop scripts in parallel with development, or even before the application is built.
2. Living Specs & Audit-Ready Tests
Use case: Use Screenshots for regulatory compliance evidence.
a) Each screenshot, along with its AI-generated code, provides accurate and executable documentation.
b) By automatically capturing new screenshots and regenerating test steps whenever the user interface changes, your tests are maintained as dynamic specifications, ensuring they remain current. Also, the need for manual documentation is eliminated.
c) These screenshots serve as valuable audit evidence for regulatory compliance (e.g., SOX, SOC 2, HIPAA, FDA rules, and banking regulations).
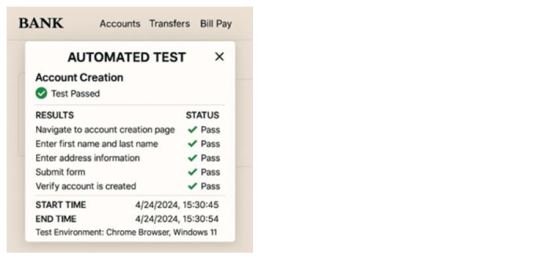
3. Baseline Rollback Verification with AI-based Automation
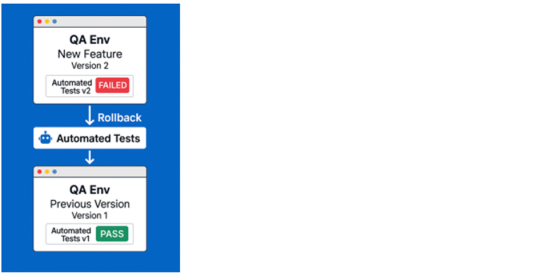
Use case: Confirm rollback success via screenshots.
Rollbacks restore a system to a previously stable state (version before the change).
Stored screenshots taken from this stable version serve as the baseline. If automated tests do not exist for the pre-rollback version, an automation team member can create tests using the stored baseline screenshots.
After the rollback: Run the automated tests created from the baseline screenshots. Compare the new (post-rollback) UI to the stored baseline screenshots.
If the automated tests pass and the screenshots match, it strongly indicates the rollback was successful.
4. Documentation to Automation
Use case: Build automated tests from documentation
5. Pre‑release sign‑off by Product Managers who dislike dealing with test tools

Use case: Product managers approve features by reviewing them and capturing screenshots
Product managers approve features by reviewing them on a laptop and documenting key interactions and test steps through screenshots. The automation team then converts these approved screenshots into automated tests, which must pass before the feature can be released. This approach allows the product manager to sign off without having to interact with testing tools, making the process simpler and more efficient.
6. Simplified Cross-browser Testing

Use case: Build a single automation test and run it on multiple browsers. (See "Section 4: Cross-Browser Testing with UFT One AI: Chrome, Microsoft Edge, and Firefox" for further details.)
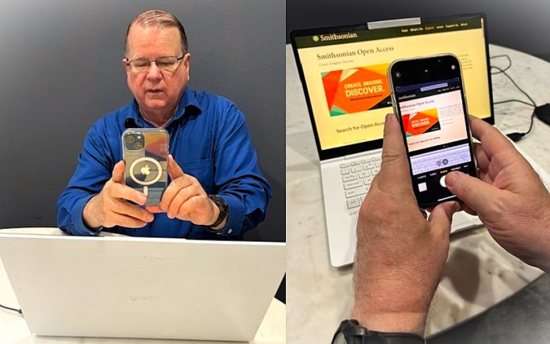
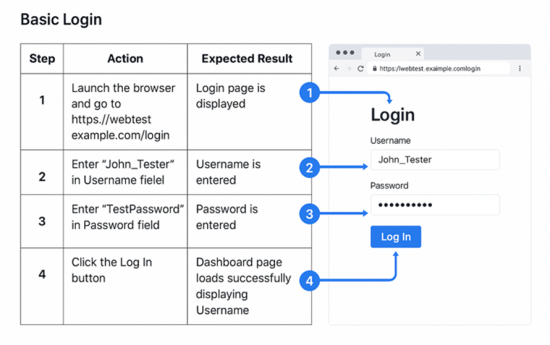
I used my iPhone to capture live images of the Smithsonian Open Access web site on my laptop while following specific test steps. I then used the iPhone photos to develop a UFT AI-driven test script.
Important: Ensure you have IT Department approval and comply with all company policies when using an iPhone camera for testing purposes.
1. Secure locked-down environment

Use case: Capturing Steps in Secure Environments
You are working in a secure environment where screenshots and automation tools are blocked. This often happens on Virtual machines, Remote desktops, and financial systems with strict security policies.
2. Fast-track demos for sales and consulting teams

Use case: A sales engineer can photograph the customer’s application during an onsite meeting.
3. Capturing Transient UI objects
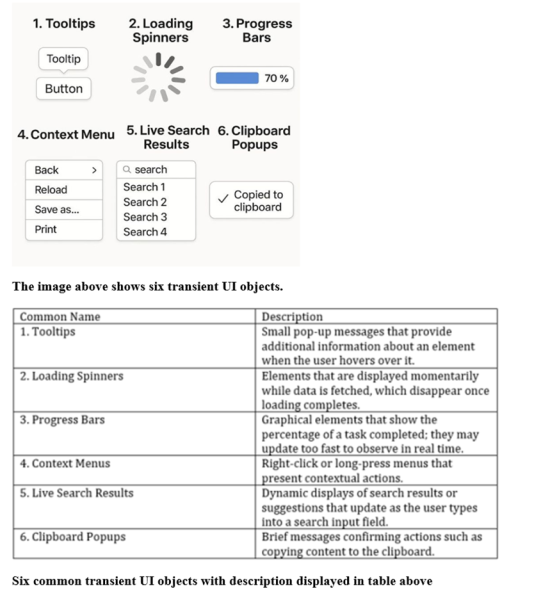
Use case: Take a photo of an object that appears momentarily to use in your script.
It is often more practical to snap a quick iPhone photo of transient objects and use it to continue developing your AI script, rather than trying to use a regular screenshot.
4. Test Generation from Teams or Remote Meeting
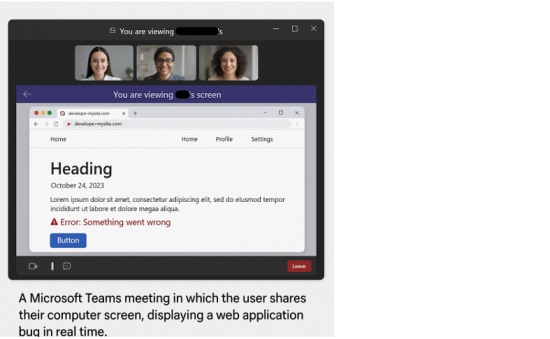
Use case: During a video call, a team member shares their screen to show the steps to reproduce a defect
5. Regulatory Evidence Testing was Conducted on Certified Devices

Use case: A photo confirms the actual hardware and physical environment with timestamp and location.
In regulated industries like healthcare, aerospace, and defense, testing on actual hardware or certified devices is required for functionality and regulatory compliance.
A screenshot only captures what is on the screen, but a photo of the test device provides important context, including the following:
6. Use ChatGPT with iPhone Photos to Improve Testing Workflows

Use case: Analyze iPhone photos with ChatGPT
I uploaded an iPhone photo of a laptop displaying the "Smithsonian Open Access" webpage into ChatGPT and then typed the prompt, "Provide a concise summary for Computer Hardware and Software and Web Application shown in photo." This is displayed below in Fig. 6a)

Fig. 6a) ChatGPT prompt with photo displayed above
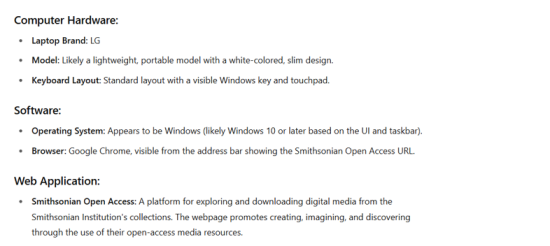
Fig. 6b) The ChatGPT response to my prompt is shown above
ChatGPT prompt2: “Give me a test case for the web page displayed.”
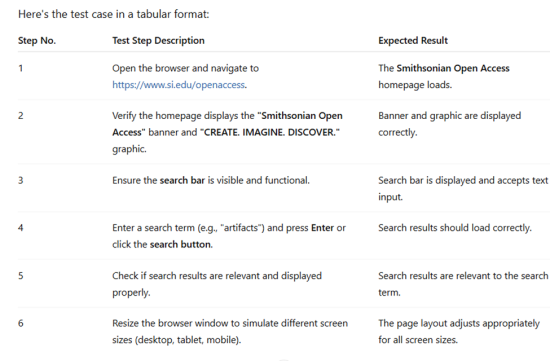
Fig. 6c) The ChatGPT response to Prompt2 displayed above
Step 1) Open UFT One and choose “Tools >> Options >> GUI Testing >> AI Detection >> General”
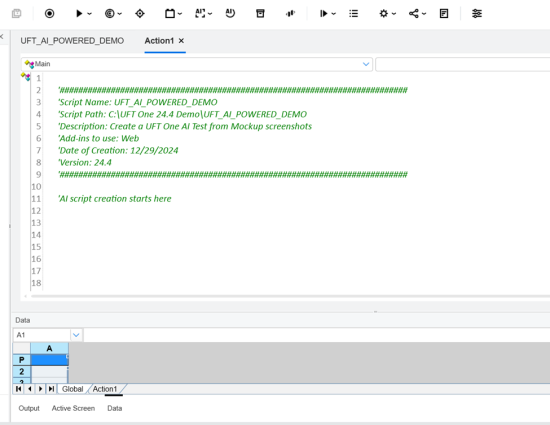
Fig. 1) A new blank UFT One AI script is open, and the script header has been populated
Step 2) I previously created a folder with four (4) screenshot images. For demo purposes, I created a folder path “C:\Users\Don Ingerson\Downloads\AI Mockup Images\.” These four mockup images will be used to develop our UFT One AI automated test, and are shown below in Fig. 2)
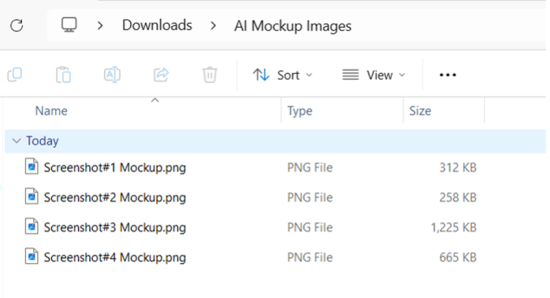
Fig. 2) Folder with four (4) screenshot images.
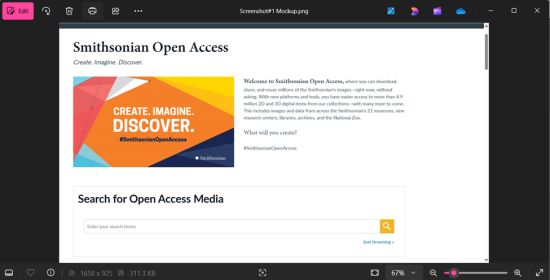
Fig. 2a) For clarity, I have opened image Screenshot#1 Mockup.png
Credit: SmithsonianOpenAccess
Media Usage: CC0
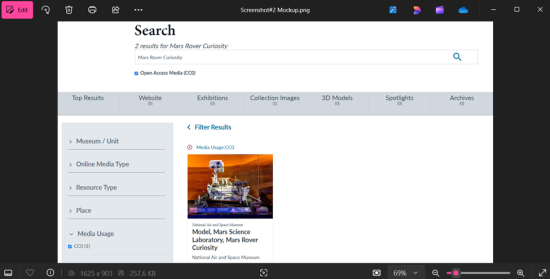
Fig. 2b) Screenshot#2 Mockup.png
Credit: SmithsonianOpenAccess
Media Usage: CC0
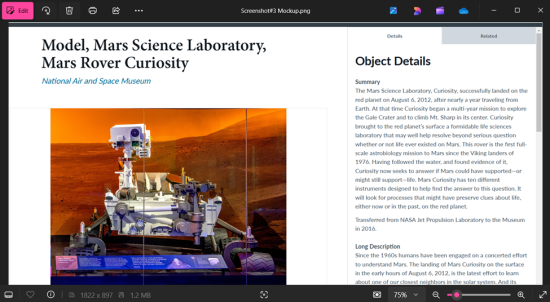
Fig. 2c) Screenshot#3 Mockup.png
Credit: SmithsonianOpenAccess
Media Usage: CC0

Fig. 2d) Screenshot#4 Mockup.png
Credit: SmithsonianOpenAccess
Media Usage: CC0
Step 3) Click on the “AI Object Mockup Inspection” Icon
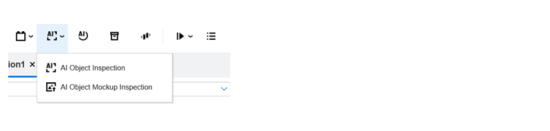
Fig. 3) “AI Object Mockup Inspection” Icon
Step 4) The “AI Inspect Mockup Images” displays
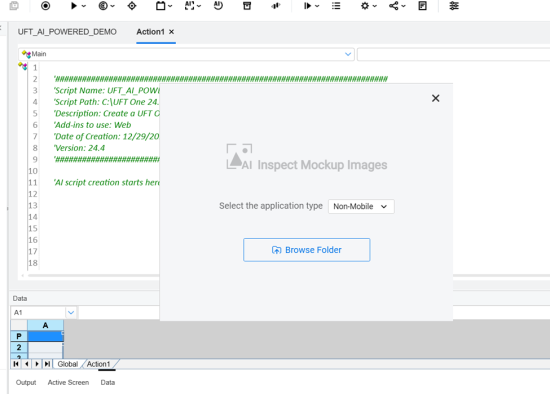
Fig. 4) The “AI Inspect Mockup Images” window
Step 5) Navigate to “C:\Users\Don Ingerson\Downloads\AI Mockup Images\” folder. Click “Select Folder.”
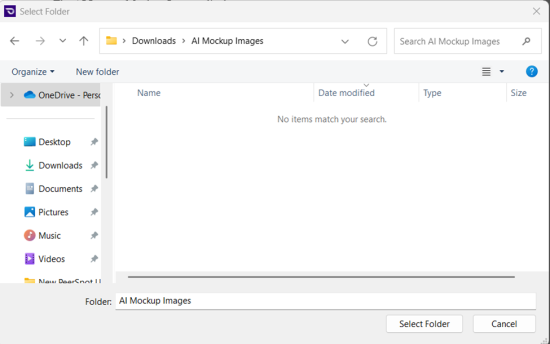
Fig. 5) The “C:\Users\Don Ingerson\Downloads\AI Mockup Images\” folder displayed
Step 6) After clicking on “Select Folder”, verify the AI OBJECT INSPECTION displays with screenshot open.

Fig. 6) AI OBJECT INSPECTION >> Mockup images window displayed for “Screenshot#1 Mockup.png”
Credit: SmithsonianOpenAccess
Media Usage: CC0
Step 7) Click on text “Smithsonian Open Access” and verify “Add to test” window is displayed.
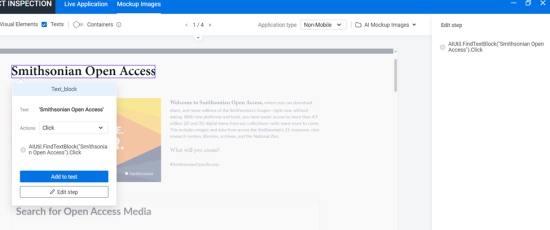
Fig. 7) The “Add to test” window is displayed.
Credit: SmithsonianOpenAccess
Media Usage: CC0
Step 8) We have changed the “Actions” from “Click” to “Verify” because we want to add a checkpoint on the text. Next, click the “Add to test” button.
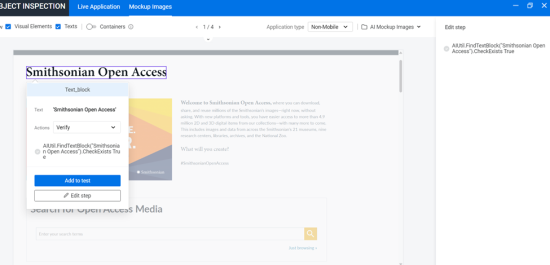
Fig. 8) The “Actions” changed from “Click” to “Verify” displayed.
Credit: SmithsonianOpenAccess
Media Usage: CC0
Step 9) In upper right corner, verify the message “Step added successfully” is displayed.
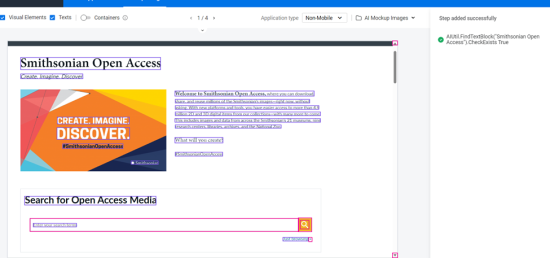
Fig. 9) In upper right corner, the message “Step added successfully” displayed.
Credit: SmithsonianOpenAccess
Media Usage: CC0
Step 10) Verify the code is automatically generated
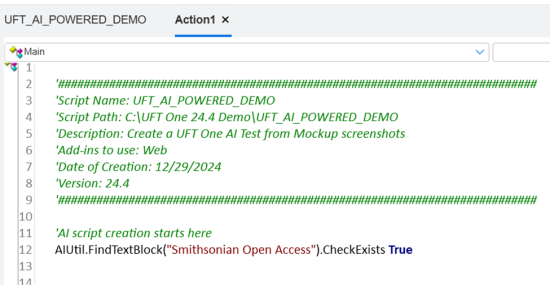
Fig. 10) The code is automatically generated on line 12 in the Integrated Development Environment (IDE).
Step 11) Repeat the process of clicking on object and “Add to test”.
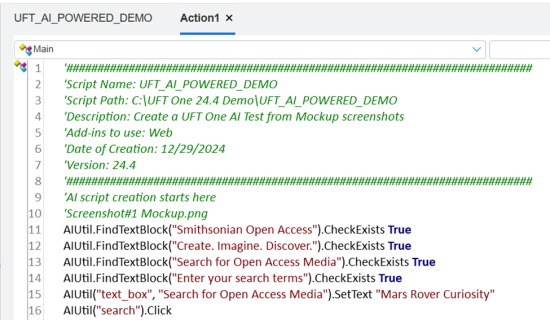
Fig. 11) Code generated for “Screenshot#1 Mockup.png” (lines 11-16)
Step 12) Repeat the process for the other three mockup images.
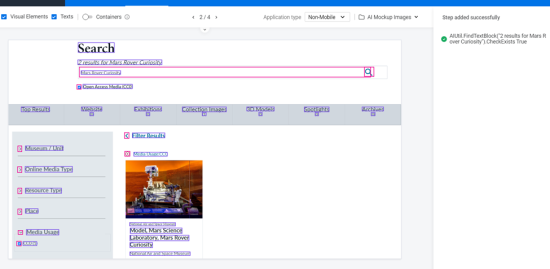
Fig. 12) Screenshot#2 Mockup.png
Credit: SmithsonianOpenAccess
Media Usage: CC0

Fig. 12a) Code generated from “Screenshot#2 Mockup.png” (lines 19-22)
Step 13) Repeat process for Screenshot#3 Mockup.png
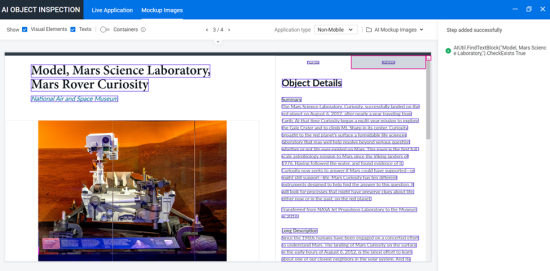
Fig. 13) Screenshot#3 Mockup.png
Credit: SmithsonianOpenAccess
Media Usage: CC0
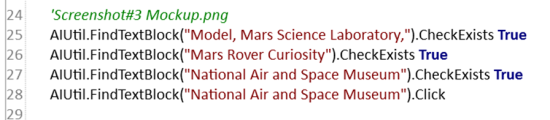
Fig. 13a) Code generated from “Screenshot#3 Mockup.png” (lines 25-28)
Step 14) Repeat process for Screenshot#4 Mockup.png
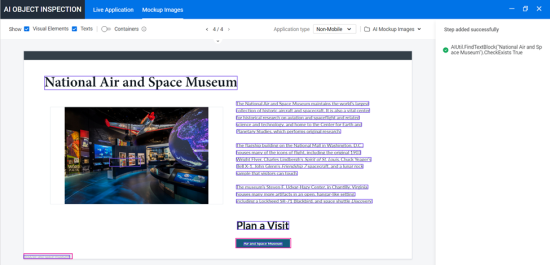
Fig. 14) Screenshot#4 Mockup.png
Credit: SmithsonianOpenAccess
Media Usage: CC0

Fig. 14a) Code generated from “Screenshot#4 Mockup.png” (lines 31-32)
Step 15) Verify code from all four (4) Mockup images is displayed
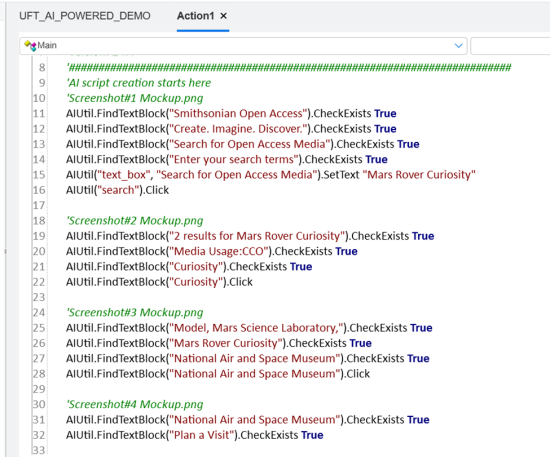
Fig. 15) The UFT script with AI code generated from all four (4) Mockup images displayed.
Step 16) Add four (4) steps of code.
Fig. 16) UFT IDE with four (4) steps added (does not include comment statements)
Note, I added steps to:
Step 17) Let the AI script run against the live Web application.
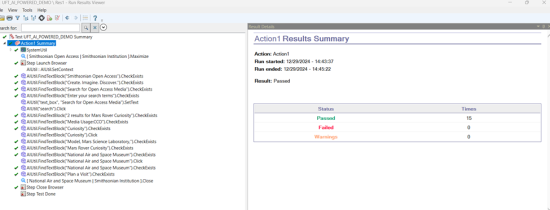
Fig. 17) The Run Results Viewer displaying steps and 15 checkpoints, which all Passed.
Step 18) Add “Scroll” statements to bring objects into focus
After analyzing the script and results, it would be beneficial to add some vertical “Scroll” statements to bring the objects into focus. Therefore, I added the following three statements in the script where needed. These statements scroll down with the corresponding number of scrolls.
Fig. 18a) “Scroll” statements displayed above
An example is shown below

Fig. 18b) The statement AIUtil.Scroll "down", 2 has been inserted on line 42.
Step 19) The script was enhanced with “Scroll” statements added and then executed.
It is noteworthy that the enhanced script with “Scroll” statements executed approximately 53% faster.
Fig. 19) Test execution results after script was enhanced with “Scroll” statements.
(Note: Building a test from iPhone photos follows the same steps, so there is no need to repeat them here.)
The example below shows an AI-driven cross-browser test, where identical UFT AI code runs on all three browsers without needing the Object Repository, making test development simpler and faster.
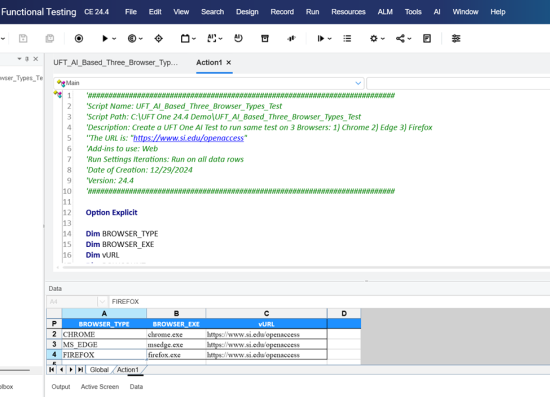
Fig. 4.1) The screenshot above displays a cross-browser UFT One AI test using Chrome, Microsoft Edge, and Firefox browsers.
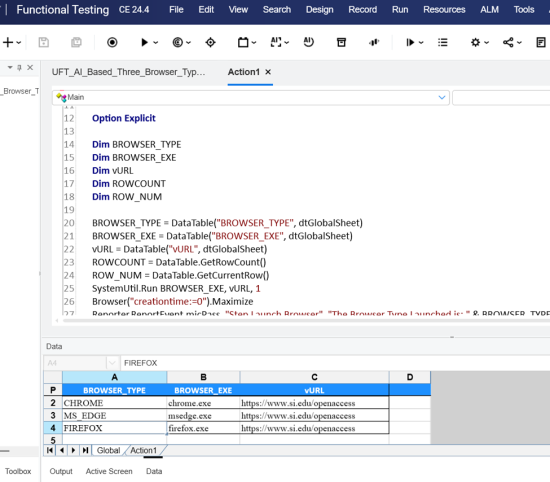
Fig. 4.2) The screenshot above displays the cross-browser UFT One AI test, including additional code in the IDE and the DataTable.
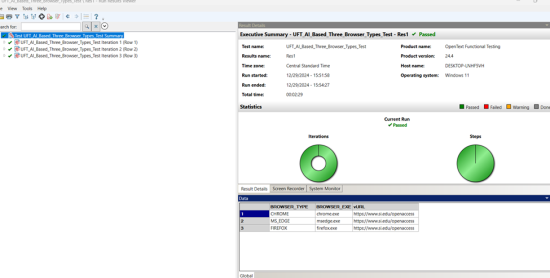
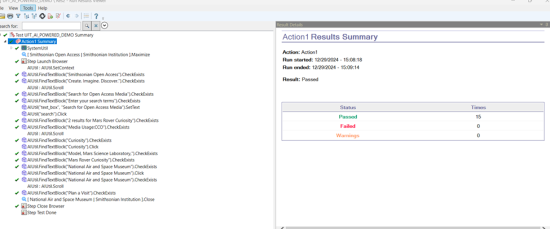
Fig. 4.3) The Run Results show that all three browsers passed with the corresponding three iterations.
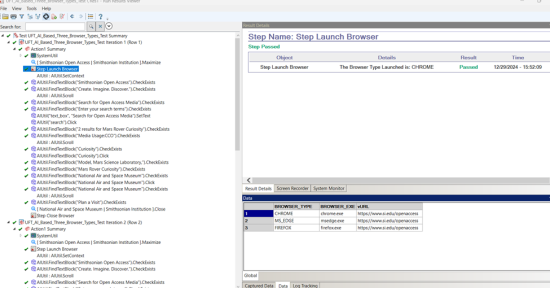
Fig. 4.4) The Run Results expanded showing individual checkpoints for Chrome browser test.
Advantages of UFT One AI-based scripts:
UFT One AI-based scripts speed up development and maintenance by eliminating the need to use a traditional object repository. For new UI tests, you can also use the AI features and the object repository; it is not an either-or choice. Generating automated tests from mock-up screenshots is an extreme form of shift-left testing because you can write automated tests before a single line of code in the application exists.
Here are five key facts about using iPhone photos in automated testing:
The following two suggestions will help when using iPhone photos to develop your script:
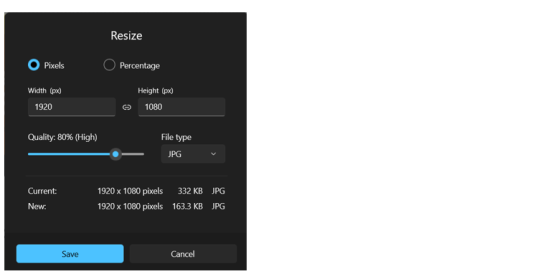
Resize photo image 1920 x 1080 Pixels displayed above
Follow the order below when creating UFT One AI scripts:
Final thoughts: Ultimately, UFT One’s AI-driven testing marks a shift in how teams approach automation. Leveraging its full AI capabilities leads to faster, more reliable releases, and significantly reduces the time spent on test maintenance.